Brighten your space with 20% off!

How to Install Push-Tap LED Lights Without Drilling
Learn how to install push-tap LED lights without drilling, using adhesive-mounted options for spaces like closets and kitchens. This guide provides step-by-step instructions and tips for ensuring strong adhesion and even light coverage without permanent installation.
2/22/20257 min read
Introduction to Push-Tap LED Lights
Push-tap LED lights have gained substantial popularity among homeowners and renters alike due to their remarkable ease of installation and versatility. Unlike traditional lighting fixtures, which often require extensive wiring and the potential for drilling into walls, push-tap LED lights provide a user-friendly alternative that can enhance any space without the need for permanent alterations. Their design allows users to simply push a button for illumination, making them an attractive option for those who seek practicality alongside functionality.
The rise of these innovative lighting solutions can largely be attributed to their adhesive-mounted options, which cater specifically to renters looking to avoid damage deposit issues or homeowners wanting to maintain the integrity of their walls. By choosing push-tap LED lights, individuals can create ambient lighting effects or bright task lighting in various areas, including kitchens, closets, and living rooms, without the lingering commitment of conventional fixtures. This flexibility allows users to easily switch locations or remove lights altogether, proving particularly beneficial when rearranging spaces or relocating.
In this blog post, we will explore effective methods for installing push-tap LED lights without the need for drilling. Our emphasis will be on practicality and efficiency, highlighting step-by-step techniques that ensure optimal results while avoiding wall damage. Readers will learn not only how to install these lights correctly but also how to maximize their benefits in enhancing the aesthetic and functional appeal of their living environments.
Choosing the Right LED Lights
The market for adhesive-mounted LED lights has grown significantly, offering various options to suit different lighting needs and preferences. Among the most popular brands are Brilliant Evolution and Mr. Beams, both known for their innovative designs and effective lighting solutions. When selecting LED lights, it is essential to consider key specifications such as brightness, battery life, and adhesive strength, as these factors will determine the suitability of each product for your particular space and requirements.
Brilliant Evolution provides a range of LED light options that are well-regarded for their high brightness levels, which can reach up to 100 lumens. This intensity makes them effective for areas requiring significant illumination. Additionally, these lights typically come with a battery life of around 100 hours, allowing for long-term use without frequent replacements. The adhesive used in the Brilliant Evolution models is designed to provide robust performance, ensuring the lights remain securely in place without the need for drilling.
In contrast, Mr. Beams offers various models tailored to specific uses. Their products often feature motion sensor technology, which can be advantageous in areas such as hallways or closets. Brightness levels for Mr. Beams lights vary, with some models reaching around 140 lumens, providing an excellent option for those needing higher lighting. Battery life also varies within this brand but generally averages around 15 to 30 hours, emphasizing the importance of the environment and usage frequency when selecting a model. Furthermore, Mr. Beams lights are engineered with strong adhesive backing, making installation straightforward and effective for non-invasive setups.
Ultimately, discerning the right LED lights for your needs comes down to comparing these specifications across different brands. Evaluating how much brightness you require, considering battery longevity, and analyzing adhesive strength are crucial steps in making an informed decision that maximizes utility and convenience in your home or workspace.
Tools and Materials Needed
When preparing for the installation of push-tap LED lights without drilling, it is crucial to gather the appropriate tools and materials to ensure a smooth and efficient process. The first item on your list should be the LED light model you have chosen, such as battery-operated or plug-in options. These lights are widely available in various designs and brightness levels, catering to different spaces and preferences.
Next, consider the adhesive supplies that will be pivotal in securing your LED lights without drilling. High-quality double-sided tape or strong adhesive putty is recommended to provide a reliable hold. It is important to select an adhesive that can support the weight of the LED lights while ensuring that it can withstand different environmental conditions, such as temperature variations. Consulting products with positive reviews will assist in making an informed choice.
In addition to the lights and adhesive, some basic tools will facilitate the installation process. A pair of scissors will be necessary to cut the adhesive tape or putty to the required length. Moreover, a measuring tape is recommended to accurately determine where the lights will be placed, ensuring they are evenly spaced and aligned. A level will also be essential to confirm that the lights are installed straight, eliminating the possibility of uneven displays that can be distracting.
Optional but helpful tools include a screwdriver (if your chosen light model requires one) and a clean cloth for surface preparation. Ensuring that the surfaces are clean before applying adhesive will help prolong the life of the installation. Overall, having the right tools and materials on hand will contribute significantly to achieving a professional-looking result in your push-tap LED light installation.
Step-by-Step Installation Guide
Installing push-tap LED lights is a straightforward process that requires minimal tools and no drilling. Begin by selecting the optimal location for the lights. Consider areas that require additional illumination, such as cabinets, closets, or under shelves. Ensure the surface is clean, dry, and free of dust or grease. This preparation is essential for the adhesive to bond properly.
Once you have identified the placement, prepare the surface by cleaning it thoroughly. Use a suitable cleaning solution and a cloth to wipe away any contaminants. Allow the area to dry completely before proceeding. Next, it's time to apply the adhesive. Most push-tap LED lights come with pre-applied adhesive strips. If yours does not, you may need to purchase a compatible adhesive tape. Cut the adhesive to size and apply it to the back of the light fixture. Make sure the adhesive covers the corners and edges for a strong hold.
After applying the adhesive, it is crucial to position the light fixture correctly. Carefully align the LEDs with the previously determined spot and press firmly for a few seconds. This step is vital to ensure that the adhesive adheres strongly. It is advisable to temporarily hold the light in place for several minutes to allow the adhesive to set effectively.
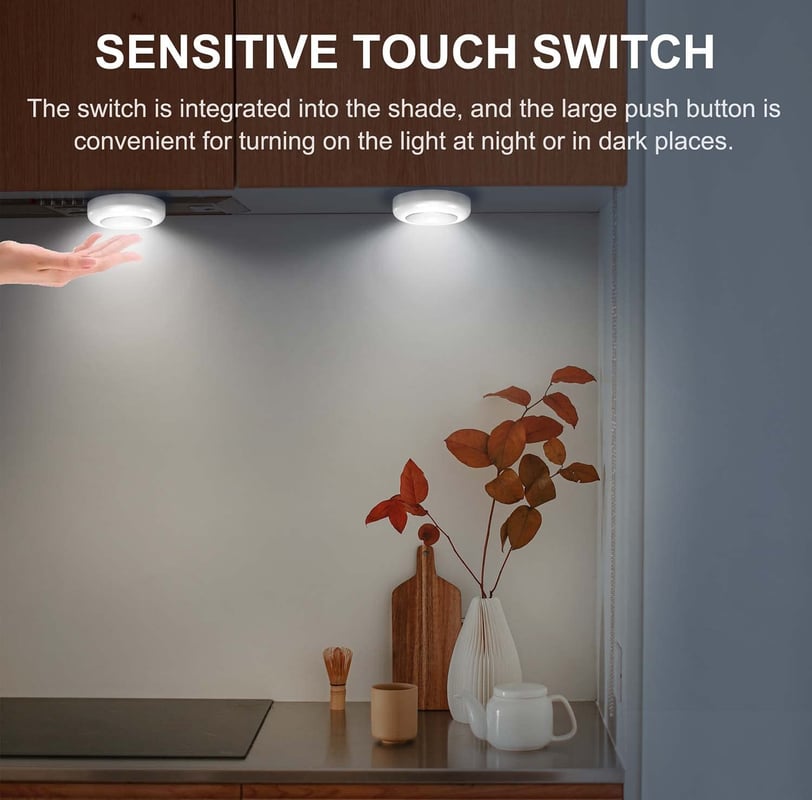
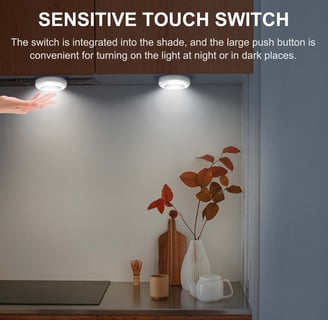
Finally, navigate to the light's push-tap feature to test its functionality. Gently press on the light to ensure it turns on and off as intended. If you experience any issues, double-check that the adhesive is secure and that the battery—if applicable—has sufficient charge. Following this step-by-step guide will enable a smooth installation process, providing effective lighting without the need for drilling.
Tips for Effective Placement
When installing push-tap LED lights, strategic placement is crucial to maximize both coverage and functionality. The first consideration is the type of room in which the lights will be installed. For instance, in closets, the absence of natural light can make selection and organization difficult. Therefore, placing LED lights near the entrance or the center of the closet will ensure even illumination, making it easy to see clothes and accessories. Additionally, within kitchens, LED lights can enhance both safety and aesthetics. Installing them under cabinets or above countertops can provide focused lighting where it is needed most, making meal preparation safer and more efficient.
Garages often present unique challenges due to limited light. To optimize the use of push-tap LED lights in this space, it's advisable to place them in areas where tasks will be performed, such as workbenches or tool storage areas. A well-lit garage increases visibility, thereby creating a safer environment for various projects. Furthermore, ensuring that the lights are not obstructed by shelves or appliances will contribute significantly to their effectiveness.
In addition to room-specific advice, it is essential to factor in the potential for dampness in certain areas, such as bathrooms and basements. Using LED lights that are rated for wet or damp locations will mitigate the risks associated with moisture. Positioning these lights high up and away from direct water exposure can enhance safety while ensuring adequate brightness. By carefully considering both the environment and specific tasks, one can effectively harness the benefits of push-tap LED lights for enhanced visibility across various settings.
Troubleshooting Common Issues
When installing push-tap LED lights, several common issues may arise that can affect their performance and longevity. One frequent problem is poor adhesion. If the lights fail to stick correctly, it may be necessary to clean the surface thoroughly before installation. Dust, oil, or any greasy residue can hinder the adhesive bond. Utilizing an isopropyl alcohol solution to wipe down the installation area can enhance adhesion, ensuring the lights stay securely in place.
Another common issue is limited battery life. To address this, it is crucial to check the quality and type of batteries being used. Lower quality batteries may result in shorter operational capacity. For optimal performance, select high-quality batteries that are compatible with the specific push-tap LED lights being used. Additionally, consider factors such as usage frequency; if the lights are consistently used in high-traffic areas, opt for rechargeable models for convenience and sustainability.
Uneven lighting can also be a concern with push-tap LED lights. This problem typically arises from improper placement or angling of the lights. To rectify this, evaluate the installation angles and positions. Make adjustments as necessary to ensure that the lights evenly illuminate the desired areas. Furthermore, using a flashlight during installation can provide better visibility, allowing for precise placement of the lights.
In cases where these problems persist despite troubleshooting efforts, consulting the product manual can provide additional insights specific to the LED light model. Utilizing customer support from the manufacturer can also be invaluable for resolving any unresolved issues. Taking these preventative measures and troubleshooting steps can ensure that your push-tap LED lights function effectively and serve their purpose over time.
Conclusion and Final Thoughts
In conclusion, installing push-tap LED lights without drilling offers a practical and efficient solution for enhancing the illumination of various spaces. This method provides a clear advantage over traditional lighting installations, as it eliminates the need for extensive tools and wall damage. Instead of battling with cumbersome drill bits and wall anchors, these innovative lights allow for a seamless enhancement of both functionality and aesthetics in your home.
The benefits of this installation method are manifold. Firstly, it saves time and effort, proving to be especially useful for renters or those who frequently change their decor. Moreover, the versatility of push-tap LED lights makes them suitable for a variety of applications, whether under kitchen cabinets, in closets, or illuminating hallways. The adhesive backing and battery-operated design ensure that installation can be completed quickly and without the need for professional assistance.
We encourage readers to experiment with different placements and configurations of push-tap LED lights to discover the best lighting solutions for their particular environments. Whether lighting a dark corner or enhancing an artwork display, these fixtures can transform any area with minimal commitment. We would like to invite our readers to share their own experiences, tips, or creative installations, fostering a community interested in innovative lighting solutions. Engaging in this dialogue can undoubtedly inspire others and lead to novel ways to implement push-tap lighting in their spaces.
Ultimately, easy installation and significant benefits make push-tap LED lights an excellent choice for anyone looking to brighten their home. We look forward to hearing about your experiences and learning from your insights as you embark on your lighting journey.